2024卫生行业网络安全技能大赛(测试赛) Server 开局先抓包 抓平台check的流量 分析check 逻辑
登录Server服务器
doker ps 查看对应端口和业务
1
2
3
4
5
6
7
8
9
CONTAINER ID IMAGE COMMAND CREATED STATUS PORTS NAMES
发现几个web 服务,既然是web,肯定有tcp流量,check大概率会用http请求去检查漏洞是否修复.根据这个逻辑,那我们先抓包分析请求数据是什么,从而判断怎么修复
发现这个Ubuntu有tcpdump命令,可以直接使用这个命令进行抓包
1 tcpdump -i any -w aaaa.pcap
-i any :抓所有网卡的包
-w aaaa.pcap 保存数据包 用于后续Wireshark 分析流量
开启抓包
点击平台的申请check按钮
等待一会等平台check完成
终端中按ctrl + c 停止抓包
将 抓好的 aaaa.pcap 下载到本地电脑(我用的xshell+xftp)
用Wireshark 打开
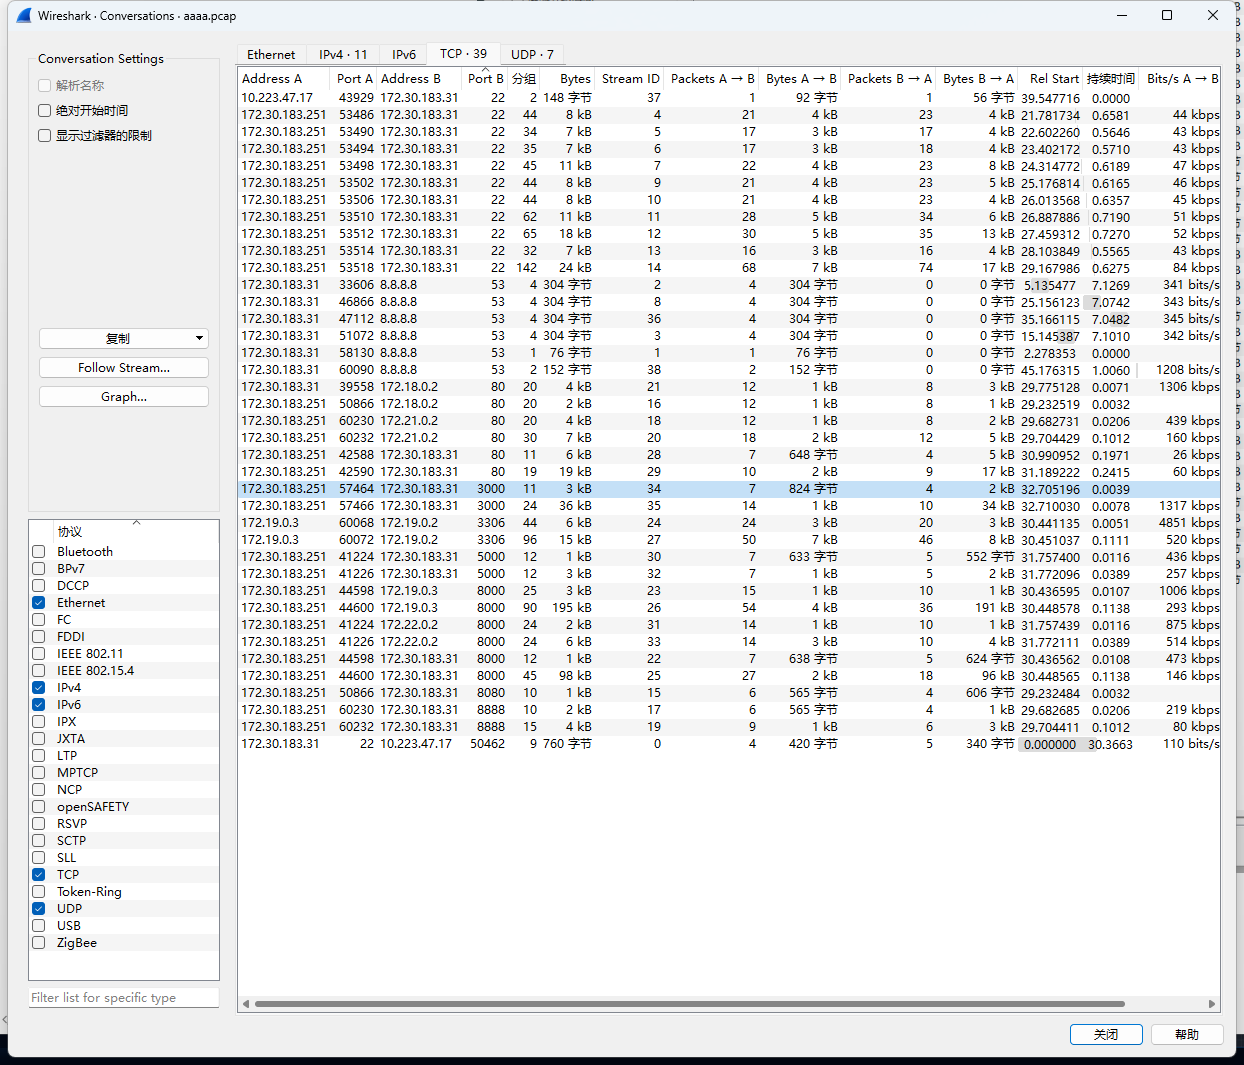
在 统计->会话->TCP 菜单中
可以看到 抓到了 很多服务端口的流量 并且来自check ip 172.30.183.251 (抓包要check后多等一段时间再停止 上面这个抓包不完整 后面重新抓了)
我们可以根据ip 端口等方式过滤流量;再对流量进行 追踪TCP流 就可以发现这几个web 的check 机制
后门用户 使用 cat /etc/passwd 查看文件,发现 hacker 用户具有 root 权限(UID为 0),删除该用户。
尝试删除用户时可能会遇到用户被占用的错误,此时应使用以下命令强制删除:
密码过期时间 修改 /etc/login.defs 文件的 PASS_MAX_DAYS 值 为90 (题目信息里提示了90天)
1
2
3
4
root@ubuntu:~/zj
隐藏文件 在root目录下存在一个名为”…”的隐藏文件。在Linux系统中,一个点.表示当前目录,两个点..表示上一级目录,而一个点加上字符串表示隐藏文件。因此,”…”可以被视为一个隐藏文件。尝试删除该文件。
命令劫持 在使用命令时会显示 uid=0(root) gid=0(root) groups=0(root) 表示被劫持了
查看环境变量 在 .bashrc 中发现异常 删除 ~/.bashrc 中的 的这一行代码
1 export LD_PRELOAD=/root/.hook/hook.so
source ~/.basrsh 让配置生效
如果source 报错 重启下系统 reboot
check 了一遍但是没有过
然后删除了.hook 文件夹
过了
命令篡改 find 使用时报错 应该是被篡改的命令
用自己 ubuntu 中的find命令替换上去
修复成功
后来发现有一个.find.bak 的程序 应该是 篡改前的find
1
2
rm /usr/bin/find #删除被篡改的find
SUID 在/usr/bin目录下存在一个名为hacker的程序,它具有suid权限,但尝试删除时却无法成功。经过查看文件属性发现,该文件具有i属性,表示不可被任意更改或删除。
1
2
3
4
5
6
root@ubuntu:/usr/bin# rm hacker #删除
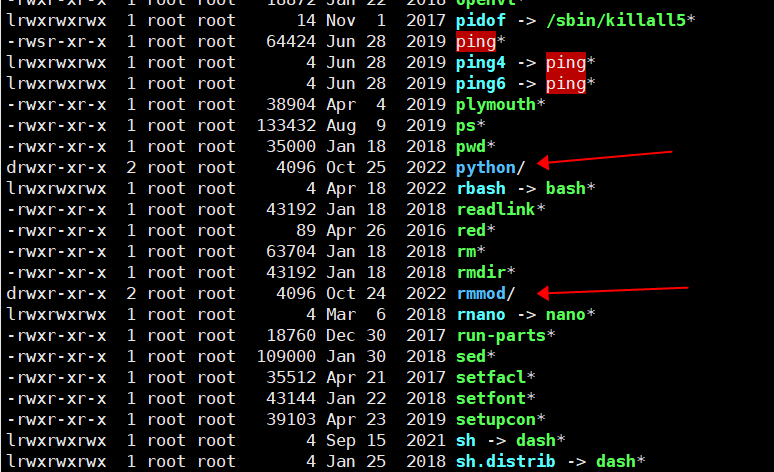
恶意驱动 在/bin文件夹下 有一个 rmmod 文件夹 一般/bin下面不会有常规文件夹 (就它两特殊 别的都是带*号)
里面有个 rmmod.ko 文件 (kernel object文件(内核模块)也称 驱动)
删掉它
1
2
root@ubuntu:/bin# rm rmmod/ -fr
删不掉~
1
2
3
root@ubuntu:/bin# lsattr rmmod/
带i属性
1
2
chattr -i /bin/rmmod/rmmod.ko
删掉了
然后再清除一下开机自启脚本 在 /etc/rc.local 发现关键代码
1
2
3
4
5
6
7
8
9
10
11
12
root@ubuntu:/etc/systemd/system# cat /etc/rc.local # !/bin/sh
直接删掉 整个服务 (最小化修复 - 删除/etc/rc.local中两行关键代码)
1
2
3
4
5
systemctl stop rc-local.service
恶意进程 通过top命令查看后台进程 按c 显示完整命令 N 固定PID排序
通过分析发现 python3 执行了一个py 文件不知道干啥的
cat 一下 果然是 在写webshell
干掉进程 kill 1542
删除恶意脚本 rm /bin/python -fr
再删掉 遗留的webshell rm /var/www/html/webshell* -fr
上题已经删除了开机启动 如果没删 再执行一般上题的删除开机启动操作
定时任务 cron 定时任务主要配置文件夹 为 /var/spool/cron/ 、 /etc/crontab、 /etc/cron.d/ /etc/cron.hourly、/etc/cron.daily、/etc/cron.weekly、/etc/cron.monthly
使用 crontab -l 没有发现定时任务 那就一个一个找
通过对比自己ubuntu的配置 发现/etc/cron.d/ 多了一个php 的配置 但是无害
/var/spool/cron/crontabs下有一个sshd的配置
cat 并没有显示任何东西 做了手脚
1
2
3
4
5
root@ubuntu:/var/spool/cron/crontabs# cat sshd # DO NOT EDIT THIS FILE - edit the master and reinstall. # (- installed on Sat Oct 8 16:14:38 2022) # (Cron version -- $Id : crontab.c,v 2.13 1994/01/17 03:20:37 vixie Exp $)
使用vim打开发现了猫腻
1
2
3
4
# DO NOT EDIT THIS FILE - edit the master and reinstall. # (- installed on Sat Oct 8 16:14:38 2022) # (Cron version -- $Id : crontab.c,v 2.13 1994/01/17 03:20:37 vixie Exp $)
在定时创建hacker用户
删除
apache安全配置 1 2 3 4 GET /icons/.%%32%65/.%%32%65/.%%32%65/.%%32%65/.%%32%65/.%%32%65/.%%32%65/etc/passwd HTTP/1.1 Host : 172.30.183.31:8080User-Agent : curl/7.58.0Accept : */*
通过流量分析 存在 目录遍历漏洞
进入docker查看apache配置
1 docker exec -it af24b10b66d6 /bin/bash
在httpd.conf文件中看到 对根目录的权限配置
1 2 3 4 5 <Directory /> </Directory >
Require all granted 是允许访问 这里不对 根目录不应该被访问到
改为Require all denied 即可修复漏洞
1 2 3 4 5 <Directory /> </Directory >
PHP漏洞修复 访问网页是一个ThinkPHP
由于ThinkPHP5.0框架对Request类的method处理存在缺陷,导致黑客构造特定的请求,可直接GetWebShell。
1 2 3 4 5 6 7 8 9 10 11 12 13 14 15 16 17 public function method ($method = false {if (true === $method ) {return $this ->server ('REQUEST_METHOD' ) ?: 'GET' ;elseif (!$this ->method) {if (isset ($_POST [Config ::get ('var_method' )])) {$this ->method = strtoupper ($_POST [Config ::get ('var_method' )]);$this ->{$this ->method}($_POST );elseif (isset ($_SERVER ['HTTP_X_HTTP_METHOD_OVERRIDE' ])) {$this ->method = strtoupper ($_SERVER ['HTTP_X_HTTP_METHOD_OVERRIDE' ]);else {$this ->method = $this ->server ('REQUEST_METHOD' ) ?: 'GET' ;return $this ->method;
改成:
1 2 3 4 5 6 7 8 9 10 11 12 13 14 15 16 17 18 19 20 21 22 23 public function method ($method = false {if (true === $method ) {return $this ->server ('REQUEST_METHOD' ) ?: 'GET' ;elseif (!$this ->method) {if (isset ($_POST [Config ::get ('var_method' )])) {$method = strtoupper ($_POST [Config ::get ('var_method' )]);if (in_array ($method , ['GET' , 'POST' , 'DELETE' , 'PUT' , 'PATCH' ])) {$this ->method = $method ;$this ->{$this ->method}($_POST );else {$this ->method = 'POST' ;unset ($_POST [Config ::get ('var_method' )]);elseif (isset ($_SERVER ['HTTP_X_HTTP_METHOD_OVERRIDE' ])) {$this ->method = strtoupper ($_SERVER ['HTTP_X_HTTP_METHOD_OVERRIDE' ]);else {$this ->method = $this ->server ('REQUEST_METHOD' ) ?: 'GET' ;return $this ->method;
保存,覆盖 测试无误 漏洞修复完成
ThinkPHP < 5.0.24 远程代码执行高危漏洞 修复方案-阿里云开发者社区 (aliyun.com)
Django漏洞修复 分析流量
1 2 3 4 5 6 GET /vuln/?order=vuln_collection.name);select%20updatexml(1,%20concat(0x7e,(select%20@@version)),1)%23 HTTP/1.1 Host : 172.30.183.31:8000User-Agent : python-requests/2.26.0Accept-Encoding : gzip, deflateAccept : */*Connection : keep-alive
这个请求明显是一个sql注入;对于比赛的话我们不需要修复的很好或很专业
对于这个漏洞修复的话只需要对入参判断是否有特殊的字符 比如 ; % ( ) 如果有 就返回掉不执行sql 查询
首先依然是进docker 查看源代码 找漏洞点
1 2 3 4 5 6 7 root@ubuntu:~
发现漏洞点在views.py中
1 2 3 4 5 6 7 8 9 10 11 12 from django.shortcuts import HttpResponsefrom .models import Collectiondef vul (request ):'order' , default='id' )return HttpResponse(q.values())
修复后的代码
1 2 3 4 5 6 7 8 9 10 11 12 13 14 15 from django.shortcuts import HttpResponsefrom .models import Collectiondef vul (request ):'order' , default='id' )';' , '%' , '(' , ')' ] for i in waf:if i in query: return HttpResponse('WAF BYPASS' ) return HttpResponse(q.values())
上传代码
1 docker cp views.py 170d8358a888:/usr/src/vuln/views.py
重启docker
1 docker restart 170d8358a888
测试sql注入被拦截
正常入参返回无异常
漏洞修复成功
mysql安全配置 从流量分析得到root密码
1 2 3 4 5 6 7 8 9 10 11 12 POST /phpmyadmin/index.php HTTP/1.1 Host : 172.30.183.31Accept : */*Accept-Encoding : gzip, deflateUser-Agent : Mozilla/5.0 (Windows NT 10.0; Win64; x64) AppleWebKit/537.36 (KHTML, like Gecko) Chrome/87.0.4280.88 Safari/537.36Content-Length : 35Content-Type : application/x-www-form-urlencodedpma_username =root&pma_password=rootHTTP /1 .1 302 FoundDate : Mon, 29 Apr 2024 12 :34 :12 GMTServer : Apache/2 .4 .29 (Ubuntu)
并且流量中对 172.30.183.31:80 只访问了/phpmyadmin 和登录了一下 并无其他操作 应该是检查弱口令
登录mysql 修改密码
1 2 3 4 5 6 7 8 9 10 11 12 13 14 15 16 17 18 19 20 root@ubuntu:~# mysql -uroot -p #登录命令mysql> ALTER USER 'root' @'localhost' IDENTIFIED BY '123456' ; mysql> quit
修改密码后check 通过
python漏洞修复 分析流量
1 2 3 4 5 6 7 8 9 10 11 12 13 14 15 GET /?id=%7B%25%20for%20c%20in%20%5B%5D.__class__.__base__.__subclasses__()%20%25%7D%0A%7B%25%20if%20c.__name__%20%3D%3D%20%27catch_warnings%27%20%25%7D%0A%20%20%7B%25%20for%20b%20in%20c.__init__.__globals__.values()%20%25%7D%0A%20%20%7B%25%20if%20b.__class__%20%3D%3D%20%7B%7D.__class__%20%25%7D%0A%20%20%20%20%7B%25%20if%20%27eval%27%20in%20b.keys()%20%25%7D%0A%20%20%20%20%20%20%7B%7B%20b%5B%27eval%27%5D(%27__import__(%22os%22).popen(%22id%22).read()%27)%20%7D%7D%0A%20%20%20%20%7B%25%20endif%20%25%7D%0A%20%20%7B%25%20endif%20%25%7D%0A%20%20%7B%25%20endfor%20%25%7D%0A%7B%25%20endif%20%25%7D%0A%7B%25%20endfor%20%25%7D HTTP/1.1 Host : 172.30.183.31:5000User-Agent : python-requests/2.26.0Accept-Encoding : gzip, deflateAccept : */*Connection : keep-aliveHTTP/1.1 200 OKServer : gunicorn/20.0.0Date : Mon, 29 Apr 2024 12:34:12 GMTConnection : closeContent-Type : text/html; charset=utf-8Content-Length : 1441Hello hacker,
5000端口对应了python_web_1 服务
通过请求参数发现这是一个ssti模板注入漏洞
进入docker查看源代码
1 docker exec -it d645d13b43aa /bin/bash
1 2 3 root@d645d13b43aa:/app# ls
这里的 app.py 就是源代码
1 2 3 4 5 6 7 8 9 10 11 12 13 14 15 from flask import Flask, requestfrom jinja2 import Template@app.route("/" def index ():id = request.args.get('id' , 'I think this interface is safe!' )"Hello hacker," + id )return t.render()if __name__ == "__main__" :'0.0.0.0' , port=5000 )
由于 t = Template(“Hello hacker,” + id) 这段直接用了+号拼接 所以造成了漏洞
对代码进行修复
由于docker里没有文本编辑器,我们需要再本地编辑好上传进去
修复后的app.py
1 2 3 4 5 6 7 8 9 10 11 12 13 14 15 16 17 from flask import Flask, request, render_template_string@app.route("/" def index ():'id' , 'I think this interface is safe!' )"Hello hacker, {{ user_id }}" return render_template_string(template, user_id=user_id)if __name__ == "__main__" :'0.0.0.0' , port=5000 )
将app.py 上传到Server
再使用命令传到docker里
1 docker cp app.py d645d13b43aa:/app
再重启docker
1 docker restart d645d13b43aa
访问网站将抓包的数据粘贴过去测试
1 http: //172.30 .183.31 :5000 /?id= %7 B%25 %20 for%20 c %20 in%20 %5 B%5 D.__class__.__base__.__subclasses__()%20 %25 %7 D%0 A%7 B%25 %20 if%20 c .__name__%20 %3 D%3 D%20 %27 catch_warnings%27 %20 %25 %7 D%0 A%20 %20 %7 B%25 %20 for%20 b%20 in%20 c .__init__.__globals__.values()%20 %25 %7 D%0 A%20 %20 %7 B%25 %20 if%20 b.__class__%20 %3 D%3 D%20 %7 B%7 D.__class__%20 %25 %7 D%0 A%20 %20 %20 %20 %7 B%25 %20 if%20 %27 eval%27 %20 in%20 b.keys()%20 %25 %7 D%0 A%20 %20 %20 %20 %20 %20 %7 B%7 B%20 b%5 B%27 eval%27 %5 D(%27 __import__(%22 os%22 ).popen(%22 id%22 ).read()%27 )%20 %7 D%7 D%0 A%20 %20 %20 %20 %7 B%25 %20 endif%20 %25 %7 D%0 A%20 %20 %7 B%25 %20 endif%20 %25 %7 D%0 A%20 %20 %7 B%25 %20 endfor%20 %25 %7 D%0 A%7 B%25 %20 endif%20 %25 %7 D%0 A%7 B%25 %20 endfor%20 %25 %7 D
发现代码没有被执行而是原样输出了
漏洞修复成功
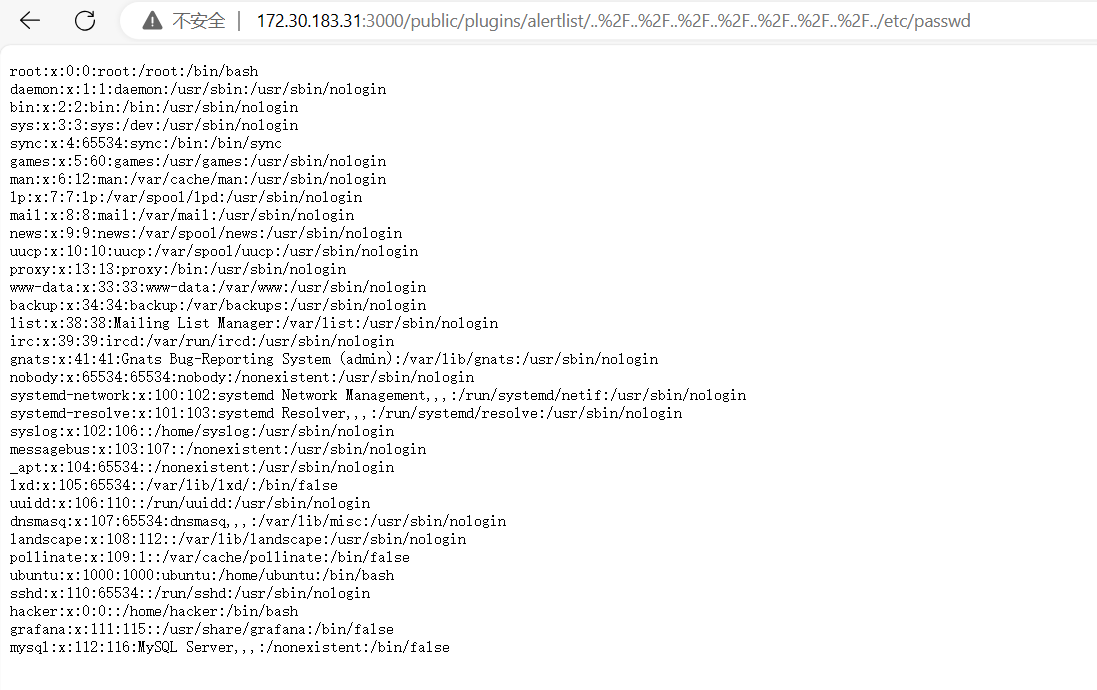
Grafana漏洞修复 1 2 3 4 5 6 7 8 GET /public/plugins/alertlist/..%2F..%2F..%2F..%2F..%2F..%2F..%2F../etc/passwd HTTP/1.1 Host : 172.30.183.31:3000User-Agent : Mozilla/5.0 (Windows NT 10.0; Win64; x64; rv:80.0) Gecko/20100101 Firefox/80.0Accept-Encoding : gzip, deflateaccept : application/json, text/plain, */*Connection : keep-alivecontent-type : application/json
存在文件读取漏洞 搜索一圈 说更新Grafana 但是比赛无外网没法更新
由于系统带有apache 于是想到使用apache 代理Grafana 从而避免漏洞
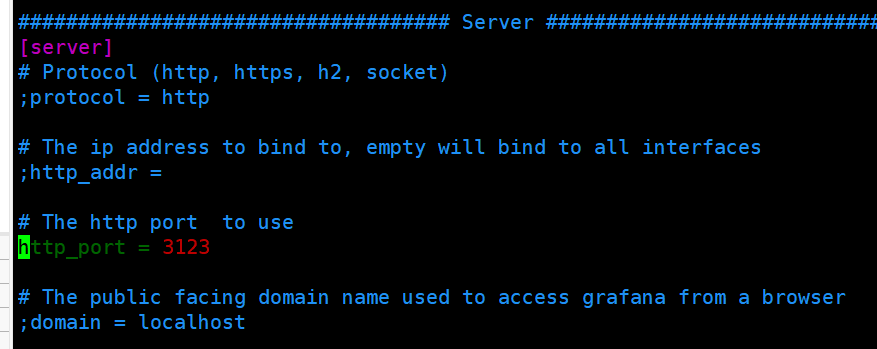
先修改Grafana配置 将服务端口改成其他
1 vim /etc/g rafana/grafana.ini
重启下docker
然后建立apache代理
先开启apache 代理模块
1 a2enmod proxy proxy_http rewrite
在 /etc/apache2/ports.conf 中增加 Listen 3000
1 2 3 4 5 6 7 8 9 10 11 12 13 14 15 16 17 18 19 root@ubuntu:/etc/apache2/sites-enabled# cat /etc/apache2/ports.conf # If you just change the port or add more ports here, you will likely also # have to change the VirtualHost statement in # /etc/apache2/sites-enabled/000-default.conf # vim: syntax=apache ts=4 sw=4 sts=4 sr noet
增加虚拟主机配置 /etc/apache2/sites-enabled/001-default.conf
1 2 3 4 5 6 7 8 9 10 11 12 13 14 15 16 root@ubuntu:/etc/apache2/sites-enabled# cat /etc/apache2/sites-enabled/001-default.conf # vim: syntax=apache ts=4 sw=4 sts=4 sr noet
重启apache
1 systemctl restart apache2
访问测试发现漏洞被修复
search_engine 这题没用从流量看出关键机制 流量只发生了大量请求 包括正常字符 和特殊字符串
分析代码
1 2 3 4 5 6 7 8 9 10 11 12 13 14 15 16 17 18 19 20 21 22 23 24 25 26 27 28 29 30 31 32 33 34 35 36 37 38 39 40 pattern = r'([0-9]{1,3}\.[0-9]{1,3}\.[0-9]{1,3}\.[0-9]{1,3}):([0-9]{2,5})' '''<!doctype html> <html lang="zh"> <head> <meta charset="UTF-8"> <meta ip="%s"> <meta port="%s"> <meta http-equiv="X-UA-Compatible" content="IE=edge,chrome=1"> <meta name="viewport" content="width=device-width, initial-scale=1.0"> <title>Ciscn Search Engine</title> </head> <body> <div class="htmleaf-container"> <div class="wrapper"> <div class="container"> <h1>Ciscn Search Engine</h1> <form class="form" method="post" action="/" id="Form"> <input name="word" type="text" placeholder="word"> <button type="submit" id="login-button">Search</button> </form> </div> <ul class="bg-bubbles"> <li>%s</li> </ul> </div> </body> </html>''' @app.route("/" , methods=["GET" , "POST" ] def index ():if request.method == 'POST' and request.form.get("word" ):"word" )if not waf(word):"Hacker!" else :"" return render_template_string(content % (str (ip), str (port), str (word)))
这个程序自带了一个waf 过滤了一下关键字
但是程序用了%s给模板赋值 这种方式存在SSTI模板注入漏洞
而且 ip 和port 是不可控变量 虽然做了正则
修复方法是
将模板改为插值语法 并加上 ip 和 port 的检查
1 2 3 4 5 6 7 8 9 10 11 12 13 14 15 16 17 18 19 20 21
替换掉docker 里的代码 重启docker 完成修复
这题在我的环境里 怎么都check不过 以至于把check次数用完了 后面在队友环境 check 成功了
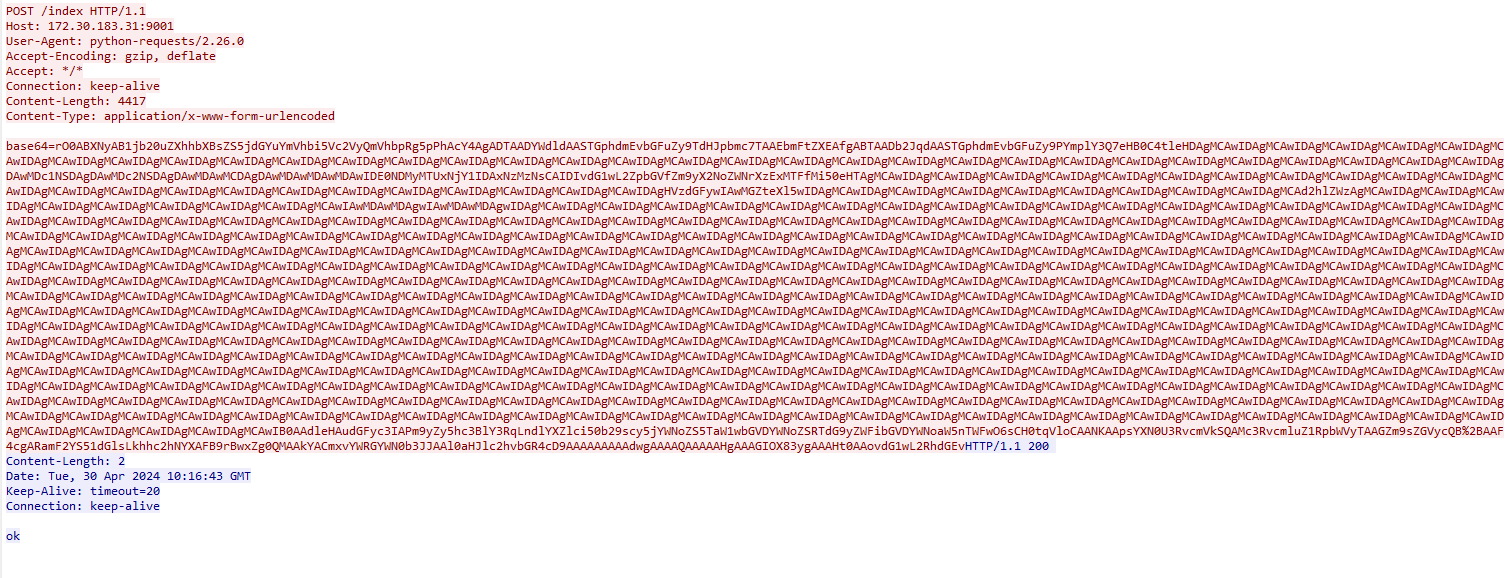
easyajva漏洞 分析流量
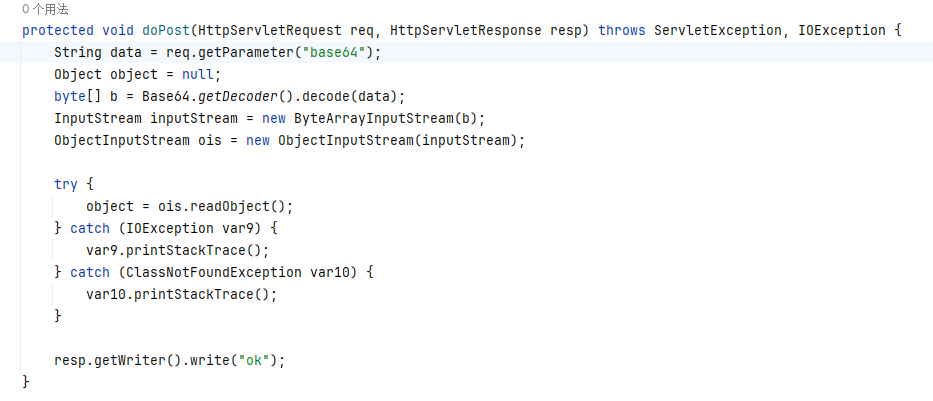
根据代码
大概是个反序列化漏洞 不太懂
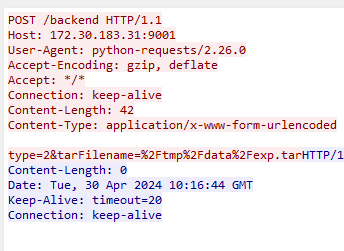
反正这段payload执行后会在/tmp/data/下创建一个exp.tar 文件
这个应该是解压exp 会得到一个软连接
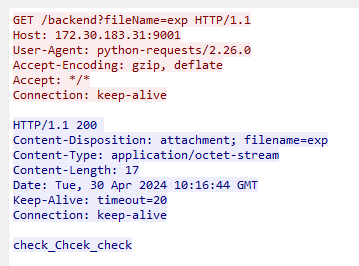
然后访问exp
大概率这里就是 check 机制 如果读不到文件 表示修补成功
JAVA不会 还得反编译 修程序是不可能修的 换思路
既然你要创建文件 那我就删文件夹 看谁快
1 while true; do rm -fr exp*; done
写个死循环 一直删 exp开头的文件 运行 然后点check
check 通过
easyphp漏洞 分析抓包的流量
1 2 3 4 5 6 GET /register.php?username=1714472198739&password=111222333&user_xml_format=%3C%21DOCTYPE%20test%20%5B%0A%20%20%20%20%20%20%20%20%3C%21ENTITY%20xxe%20SYSTEM%20%22file%3A%2F%2F%2Ffile_for_check.txt%22%3E%0A%20%20%20%20%20%20%20%20%5D%3E%0A%3Cuserinfo%3E%0A%3Cuser%3E%0A%20%20%20%20%3Cusername%3E%26xxe%3B%3C%2Fusername%3E%0A%20%20%20%20%3Cpassword%3E123%3C%2Fpassword%3E%0A%3C%2Fuser%3E%0A%3C%2Fuserinfo%3E HTTP/1.1 Host : 172.30.183.31:8086User-Agent : python-requests/2.26.0Accept-Encoding : gzip, deflateAccept : */*Connection : keep-alive
将入参做url_decode
1 2 3 4 5 6 7 8 9 username=1714472198739&password=111222333&user_xml_format=<!DOCTYPE test [
发现是明显的xxe漏洞;通过读取file_for_check.txt 来判断是否修补成功
进入docker查看源代码;找漏洞点
也可以从附件中的代码进行审计
发现register.php 存在变量覆盖漏洞;本来只期望用户输入username和password 但是extract($_REQUEST); 会接受任何参数如果收到 $user_xml_format 原来的就被覆盖了造成了xxe;
修复就是指定接受username和password两个参数就好了
修复后的代码
1 2 3 4 5 6 7 8 9 10 11 12 13 14 15 16 17 18 19 20 21 22 root@5 c4dec09b4d0:/var /www/html<?php include "utils/function.php" ;$config = include "utils/config.php" ;$user_xml_format = "<?xml version='1.0'?> <userinfo> <user> <username>%s</username> <password>%s</password> </user> </userinfo>" ;$username = isset ($_REQUEST ['username' ]) ? $_REQUEST ['username' ] : null ;$password = isset ($_REQUEST ['password' ]) ? $_REQUEST ['password' ] : null ;if (empty ($username ) || empty ($password )) die ("Username or password cannot be empty XD" );if (!preg_match ('/^[a-zA-Z0-9_]+$/' , $username )) die ("Invalid username. :(" );if (is_user_exists ($username , $config ["user_info_dir" ])) die ("User already exists XD" );$user_xml = sprintf ($user_xml_format , $username , $password );register_user ($username , $config ['user_info_dir' ], $user_xml );
办公机 加固要求
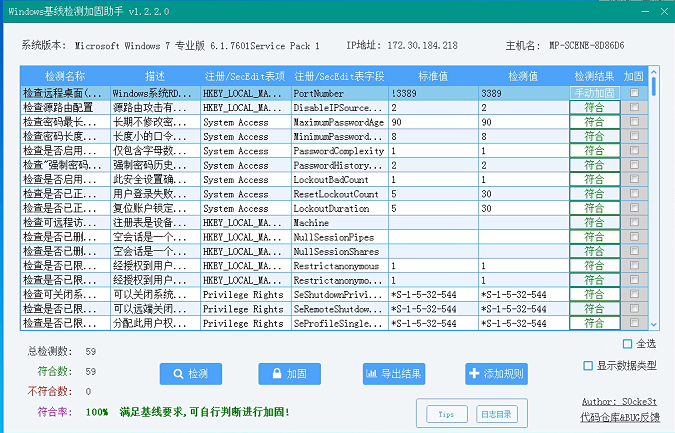
本次加固具体参数要求:
使用这个工具可以自动完成一部分题目
高危端口 控制面板->系统和安全->windows防火墙->高级设置->入站规则 配置135、137、138、139、445 端口为禁止 并删除已有相关端口的配置
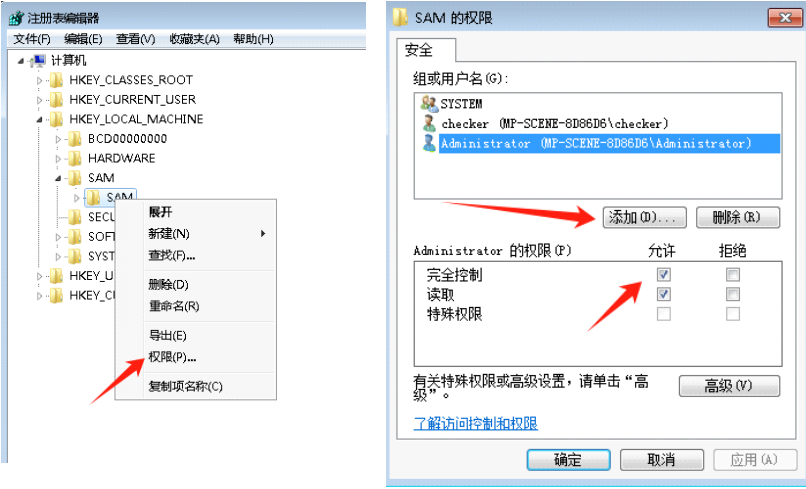
隐藏账户 计算机管理->本地用户和组->用户 发现admin$ 隐藏账户 删除报错 用注册表删
打开注册表,选择HKEY_LOCAL_MACHINE\SAM\SAM,右键子文件SAM,点击权限 添加administrator账户,并选中完全控制
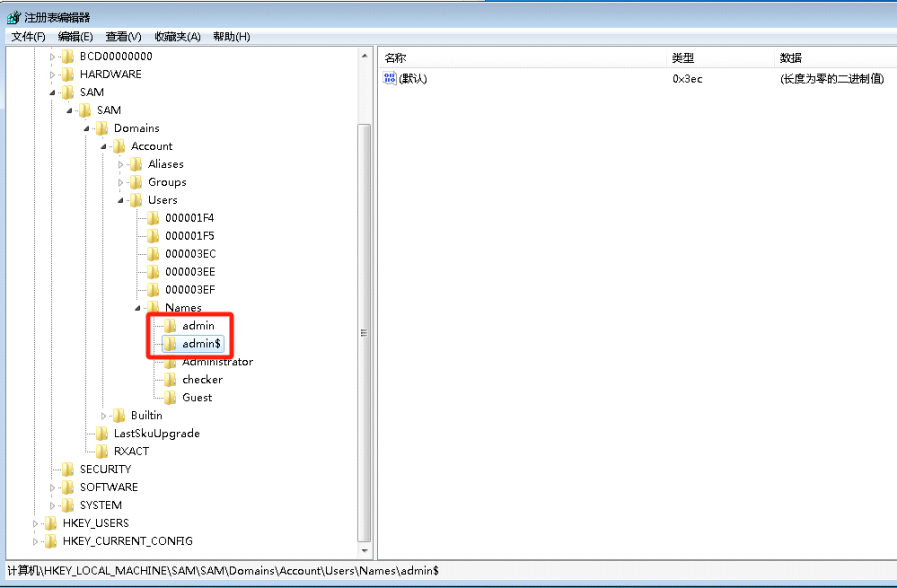
退出重进注册表可见SAM下级文件夹,找到USERS与NAMES,admin$为隐藏用户 记住admin$的值,图中是0x3ec
同时删除Names里admin$内容与Users里对应000003EC内容
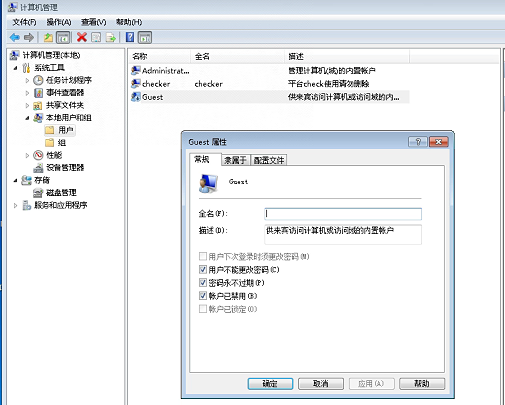
来宾账户 计算机管理->本地用户和组->用户->Guest 右键 禁用
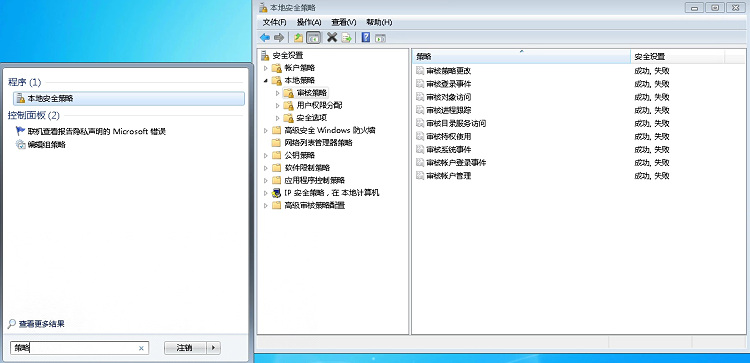
审核策略 审核核进程追 踪审核账户管理 审核账户登录 审核系统事件 审核策略更改 审核登录事件 审核特权使用 审核对象访问 打开本地安全策略->本地策略->审核策略 全部项 设置为 成功、失败
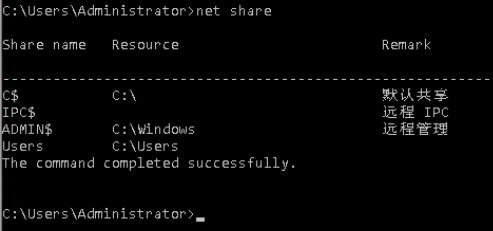
管理共享资源 查看已共享资源
使用命令关闭共享
1 2 3 4 5 net share C$ /deletenet share IPC$ /deletenet share ADMIN$ /deletenet share Users /deletenet share
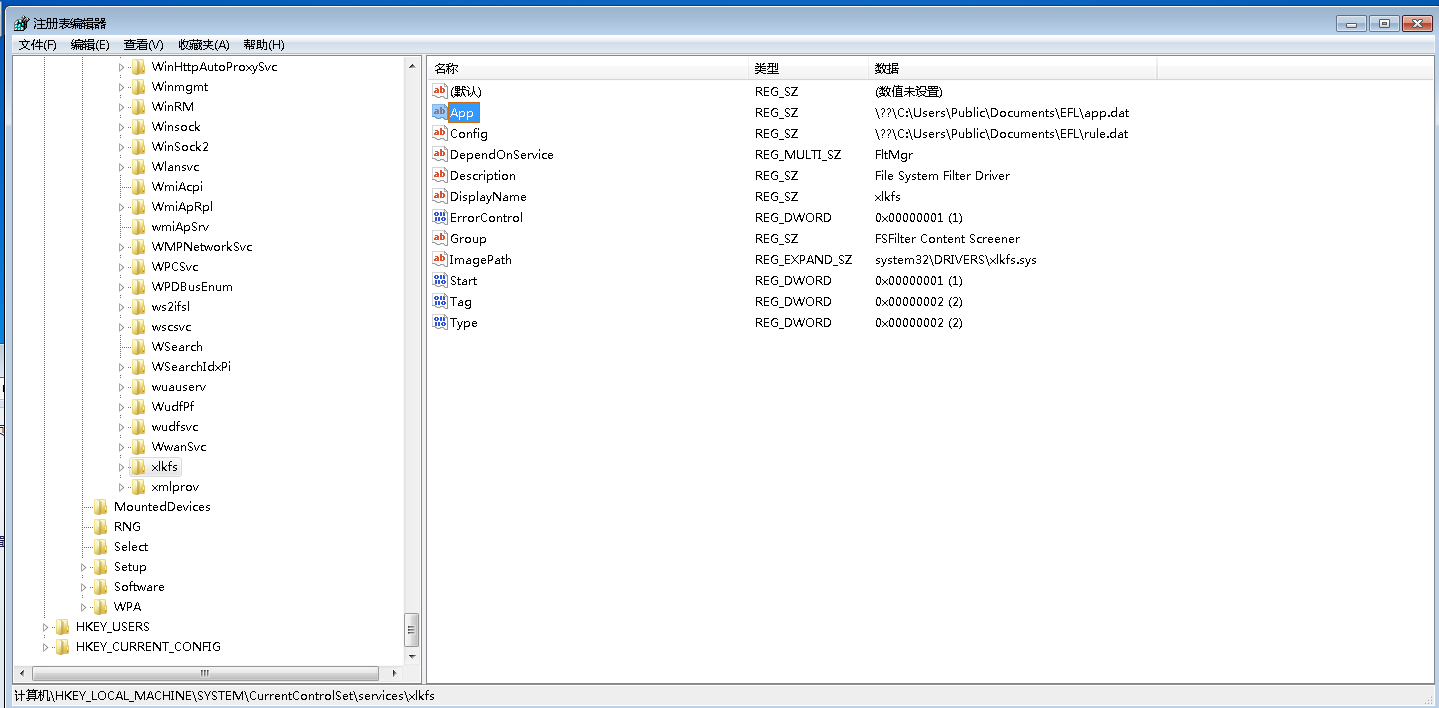
恶意程序 分析注册表发现一个奇奇怪怪的 删掉 以及 EFL 文件夹
everything 搜索关键字 删除相关文件
check 没过
安装火绒 装不上 缺少补丁 打补丁风险太大 放弃
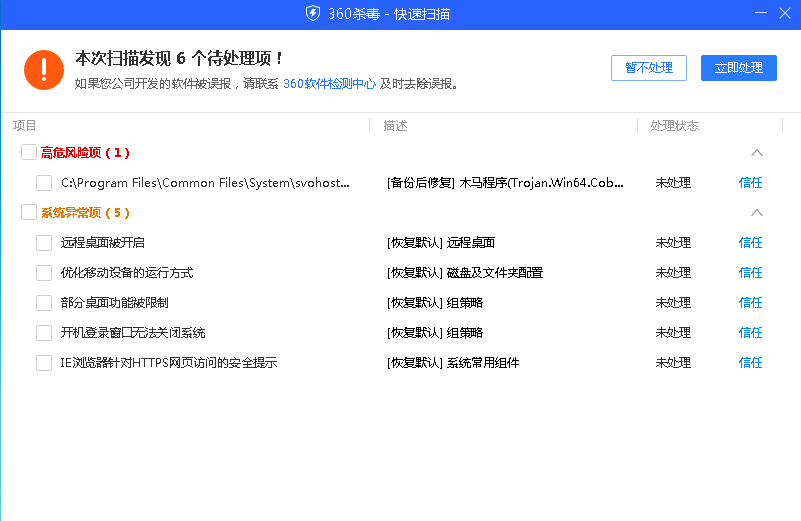
360 扫出一个 svohost.exe 删除
分析系统文件 发现 NetworkDistribution 是外来物 删掉
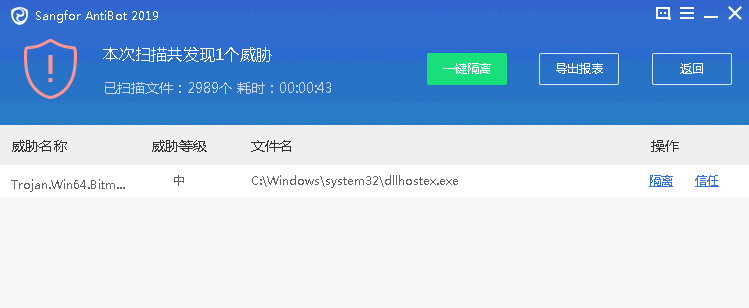
深信服查杀工具 查到 dllhostex.exe 删掉
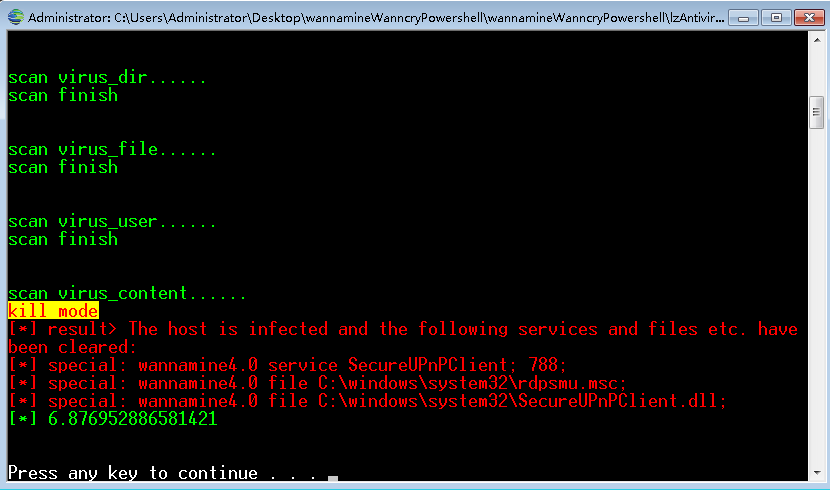
SecureUPnPClient.dll 删掉 rdpsmu.msc 删掉
check 过了
注意使用工具时 慎重 所有操作采用手动处理 以免影响系统
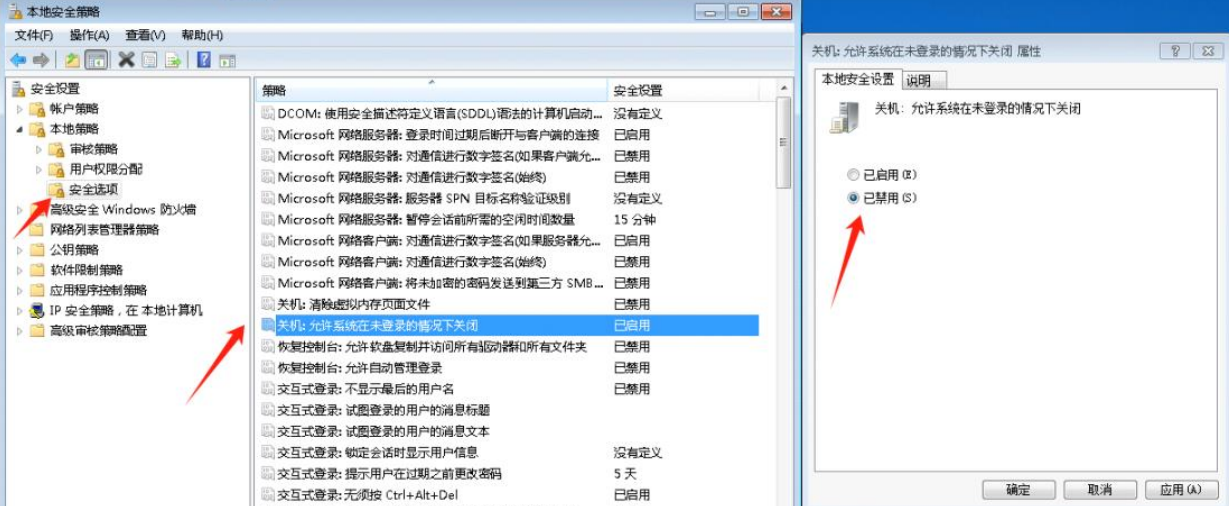
未登录关机 选择控制面板-选择管理工具-选择本地安全策略-选择安全选项-选择关机:
允许系统在未登录的情况下关闭
选择已禁用
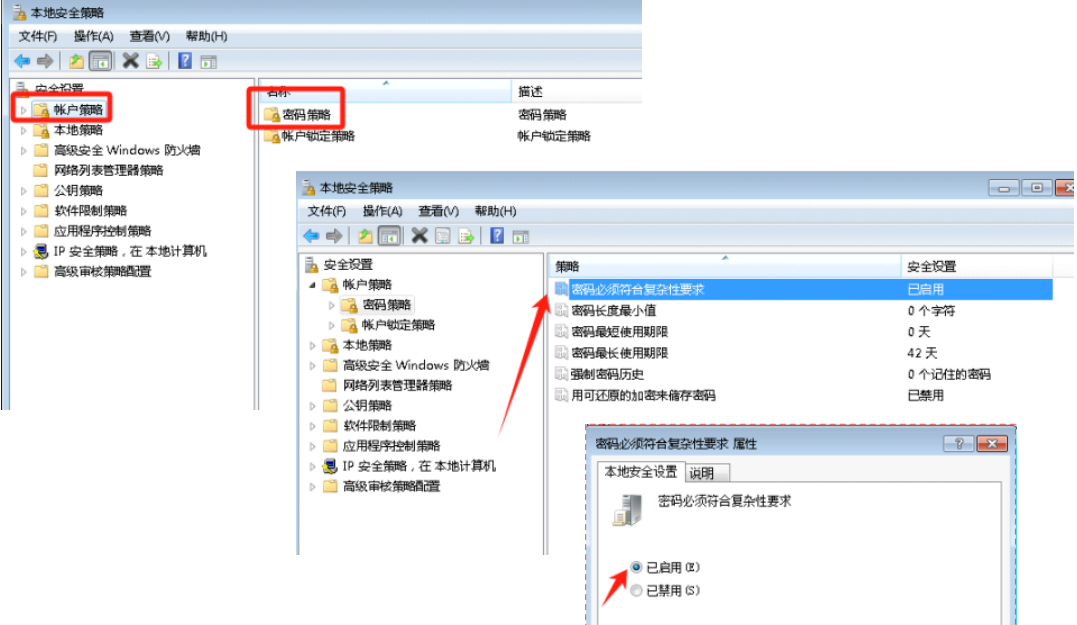
账户锁定策略 密码最长使用周期 配置同下 按加固文档配置对应项的值
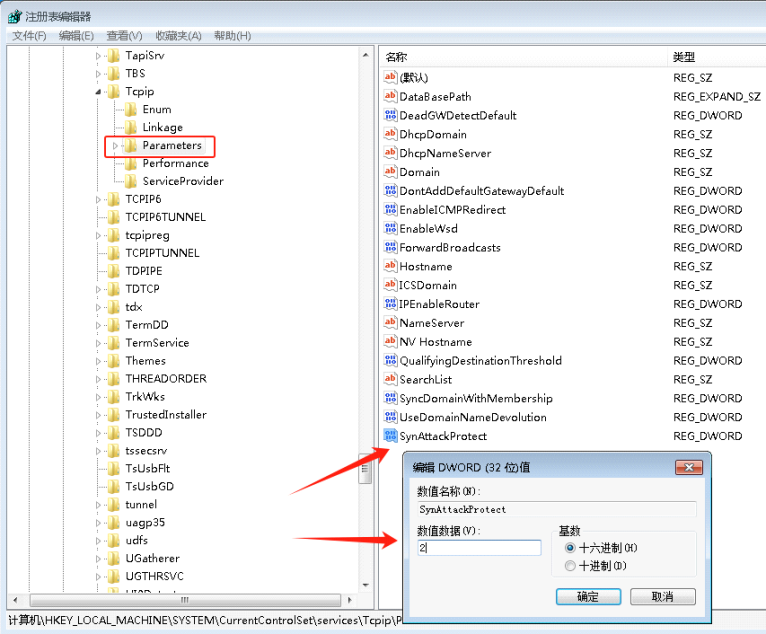
密码复杂度 启用SYN攻击保护 打开注册表 进入HKEY_LOCAL_MACHINE\SYSTEM\CurrentControlSet\Services\Tcpip\Parameters下
查找SynAttackProtect,将数值改为2
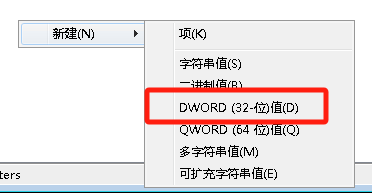
如果没有手动新建SynAttackProtect,选择DWORD(32位值)
半开连接的重试次数保护 同上注册表位置
新建TcpMaxHalfOpenRetried,值为400
半开连接的最大数量保护 同上注册表位置
新建TcpMaxHalfOpen,值为500
